The BGS Aurora Camera (AuroraCam)
In early 2016, the Geomagnetism team installed an experimental camera at the Eskdalemuir observatory to see if we could observe the Aurora Borealis during times of heightened geomagnetic activity. The aurora are caused by large electrical currents flowing in the ionosphere around 100km above our heads. These current systems are normally found in an oval around the magnetic pole at high latitudes (such as over Iceland), but during geomagnetic storms the oval expands southwards and can move to lower latitudes.
When it does, the magnetic field recorded at our observatories starts to vary rapidly - first at the station furthest north in Lerwick (Shetland Islands), then in Eskdalemuir (the Scottish Borders) and, if the storm is large enough, in Hartland (Devon). During these stormy periods, the aurora may become visible - though it's not always guaranteed. In fact, it's an area of on-going research as to why some storms produce aurora visible at low latitudes and others do not. The Geomagnetism team issue alerts if we think the aurora may be visible in the next day or two. However, we are not always correct as there are large uncertainties about how intense or large a storm may become.
Any aurora pictures?
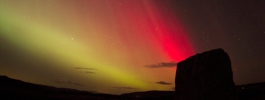
As we enter the maximum phase of the current solar cycle, geomagnetic storms become more frequent compared to when the camera systems were first set up in 2016. Rain and clouds have obscured the aurora sightings on some evenings. Rain and lightning damage to the camera equipment resulted in the cameras being out of action for much of 2024 and missing out on capturing the May 2024 geomagnetic storm. Fortuitously, clear skies on the evenings of 10th-11th October 2024 and 1st January 2025 at Eskdalemuir provided the best chance for the camera to capture the aurora resulting from geomagnetic storms. The images were processed to increase the gain and the colours have been auto-corrected using IRFANview.
Hardware
We decided to see if we could capture images of the aurora by using a camera automatically triggered from magnetic field variations at an observatory. We've been working with Raspberry Pi computers for our School magnetometer project over the past few years so we are familiar with them. As you can now buy a cheap five mega-pixel camera for the Pi, it seemed a good item to experiment with.
We bought the following items of hardware:
- Raspberry Pi 3 + case
- PiCam NoIR filter (5MP)
- Off the shelf lens (2.9mm focal length, f1.6, ~100 degree FOV)
- Lens holder to mount it to the PiCam
- IP68 waterproof box
- Blown transparent Perspex dome
- Power over Internet (PoE) connectors
- Some cabling and bits of metal
The total cost is around £120. We use the PoE connectors to pass power to the Pi and to enable communications with it using just a single cable.
We then built the system into the waterproof box. It's shown below with an initial fisheye test lens but without the external Ethernet cable plugged in. Tests showed that the lens had large aberration on the edges so we bought another lens and mounted it directly onto the PiCam board. (Note you have to remove the small lens that comes with the PiCam first.)


Software
We chose to write our software in the Python language. This comes with the Raspberry Pi as part of the Raspbian OS. There are also many useful modules that are freely available.
There are three things needed to make the system work:
- set the camera up to trigger on high geomagnetic activity
- check that it is in fact dark enough to view aurora, and
- work out what the exposure settings for the camera should be.
The first problem can be solved by querying a magnetic real-time index such as the Kp or Dst index. These are available from the NOAA SWPC or Kyoto University. The Kp is updated every 15 minutes or so and is actually a global index rather than indicating local activity. The Dst index is an hourly index and again reflects global activity.
Instead we chose to use a BGS produced index called the hourly standard deviation index (HSD). This is a local activity measure which is updated every five minutes. Code was written to download these data every five minutes using the urllib2 modules in Python. The value at the end of the file was checked. Thresholds of 35 nT for Lerwick and 20 nT for Eskdalemuir were set to trigger the camera. If either is reached the camera is triggered, as on a clear night, the aurora may be visible on the horizon toward Lerwick though it may not have reached the Scottish Borders yet.
The next task is to work out if it is dark. For this, the pyEphem package was installed. For a given latitude and longitude and time, the pyEphem package works out what the local sunset and sunrise times are.
Finally, we chose the picamera module to drive the camera. From research on the web and testing in a dark location (i.e. the office at night-time) , it was found that setting the shutter speed to 6 seconds with an ISO of 800 should be suitable for capturing images of the stars and hopefully aurora.
So, in summary, the code runs a check every five minutes. It initially downloads the latest HSD file and tests if HSD has become larger than the threshold. If so, the code checks if it is dark and then the camera is triggered. A timestamp is placed onto the image and a note is made into a log file. The camera continues to take images every five minutes until the geomagnetic activity declines or the sun rises.
Installation
Eskdalemuir observatory was originally built in 1904. As it's very rural, it's very dark at night but has limited bandwidth for transmitting data, given all the other instrumental demands on it. Hence we have to limit the size of the images and frequency with which we can transfer them out of the Pi. Eskdalemuir is also a rather wet and cloudy place, so even if there is strong magnetic activity, we may not capture any decent images.
The camera was installed in June 2016. The first task was to check it all worked with the BGS network in Eskdalemuir. It was set up in the Superintendent's office and all worked well (image below).
The next task was to lay the PoE cable from the network switch in the office to the roof. This involved passing a cable through two floors, a window and up to the balcony where we wanted to mount the camera. Once the wire was laid, the camera was mounted on some unused scaffolding and the dome was placed on top.
Once the camera was mounted on the roof, it was angled to point north and just capture the tops of the trees visible to the left of the image (below).


Future plans
Add the captured aurora images to our geomagnetic storm forecast pages the following day once they have been processed. It will also be interesting to see if this relatively cheap and cheerful setup will survive the winter months.
Contact
For more information please contact Dr Ciarán Beggan.
Back to the top.